How to Get a PS2 BIOS for PCSX2 Legally and Safely (My Practical, No-Nonsense Guide)
If you’re setting up PCSX2 and you’re stuck at the part where it asks for a PS2 BIOS, you’re not alone. This is the point where most people get confused, because PCSX2 installs like a normal app… and then suddenly you’re being asked for a file you’ve never had on your computer before.
Here’s the simple truth: PCSX2 does not (and should not) ship with the PS2 BIOS, because the BIOS is Sony’s copyrighted system software. Without a BIOS, PCSX2 can’t properly boot into that PS2 “environment” that games expect—so your games won’t start, settings won’t save correctly, and the emulator may just sit there doing nothing.
In this guide, I’ll walk you through what the BIOS actually is, why PCSX2 needs it, and the legal, safe way to get one: dumping the BIOS from a PlayStation 2 you personally own. I’ll also show you how to add it to PCSX2 and fix the most common problems.
Quick note (important): I’m not going to point you to BIOS download sites or “pre-packed BIOS bundles.” The act of sharing or downloading PlayStation 2 BIOS files which you do not possess results in copyright violations, while this practice serves as a method for criminals to distribute malware. I will maintain this operation in a manner that upholds both legal requirements and safety standards.
What the PS2 BIOS is (in plain English)
The PS2 BIOS is basically the console’s startup and system brain.
When you turn on a real PlayStation 2, it doesn’t jump straight into a game. It:
- initializes the hardware,
- handles memory cards,
- controls system settings (language, time zone, video mode),
- and provides the system-level functions that games call while running.
That’s the BIOS at work.
The PCSX2 program functions as a complete hardware simulator while its BIOS component serves as the official PS2 system software. The most precise system performance requires both components for operation.
Why PCSX2 needs a BIOS
PCSX2 can’t legally include Sony’s BIOS, so it asks you to provide it. And yes—without the BIOS, most normal PS2 boot behavior won’t happen.
When your BIOS is missing or not configured, you’ll usually see one of these situations:
- PCSX2 keeps asking you to “Select a BIOS”
- you get a “BIOS not found” style error
- you try to boot a game and it just doesn’t launch
- the emulator opens, but never reaches the PS2 splash/boot process
Once the correct BIOS is in place, PCSX2 can:
- perform a proper PS2 boot
- create and manage virtual memory cards
- handle region-related system behavior more reliably
- improve compatibility with certain games
PCSX2 features worth knowing (so you configure it right)
Before we go further, I want you to understand why PCSX2 is worth doing properly. When you set it up right, you’re not just “running PS2 games”—you’re often getting a better experience than the original console output.
Here are the PCSX2 features I personally think matter most for everyday users:
- Higher internal resolution
You can render at 2x/3x/4x (or more) so games look sharper than original PS2 output. - Widescreen patches (where supported)
Some games can be safely patched into widescreen. Results vary by title. - Controller flexibility
DualShock-style controllers work great, and you can map exactly how you want. - Save states (use with care)
Convenient, but I still recommend using in-game saves too for stability. - Per-game settings
PCSX2 lets you tweak settings game-by-game when one title needs special handling. - Performance tools
Speedhacks and renderer options can fix slowdowns—if you use them responsibly.
That said, none of this matters if the BIOS setup is wrong—so let’s do that part properly.
The legal way to get a PS2 BIOS: dump it from your own console
The most reliable and legally safe method is:
Dump the BIOS from a PlayStation 2 you personally own.
That way:
- You’re not downloading copyrighted system software from strangers
- You’re not risking infected ZIP files
- You’re using the BIOS you’re actually licensed to use with your own hardware
This is the method emulator developers themselves generally point people toward (in one form or another), because it respects copyright and reduces risk.
What you’ll need (checklist)
Here’s what you should have ready:
- A PlayStation 2 console (your own)
Any standard retail PS2 is typically fine. - A PS2 memory card
Ideally an official 8MB Sony card, but many third-party cards work. - A USB flash drive
Small is fine. Format matters more than size. - A computer
Windows, Linux, or macOS—doesn’t matter for the BIOS file itself. - A way to run a BIOS dumping tool on the PS2
This usually means a homebrew launcher environment (commonly done via a memory card setup).
If you’re not familiar with PS2 homebrew: don’t worry. You don’t need to become a “console modder.” The goal is simple—boot a trusted utility, dump the BIOS, and stop there.
How BIOS dumping works (high-level, safe explanation)
I’ll explain this in a way that’s practical without turning it into a “hack your console” tutorial.
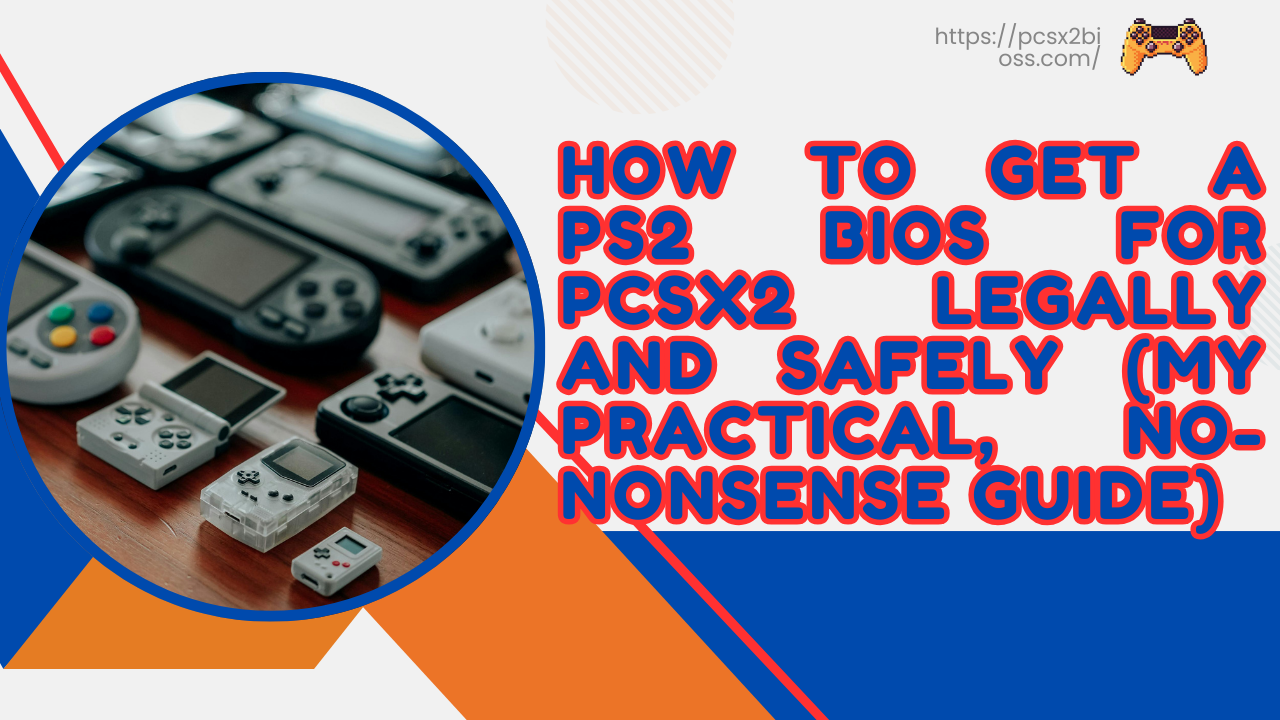
The general process looks like this:
- Prepare your USB drive (FAT32)
- Boot your PS2 into a homebrew launcher environment
- Run a BIOS dumping utility
- Save the BIOS files onto your USB
- Copy those BIOS files onto your PC
- Point PCSX2 to the BIOS folder
Step 1: Format your USB drive correctly (FAT32)
The PS2 is picky with USB storage formats. FAT32 is the safe choice.
On Windows:
- Plug in USB
- Right-click the drive → Format
- Choose FAT32
- Start
On macOS:
- Disk Utility → Erase
- Format: MS-DOS (FAT) (this is FAT32 in Apple language)
- Scheme: Master Boot Record (if you see the option)
Step 2: Get the dumping tool onto the USB
The majority of PS2 BIOS dumping tools operate through an executable program which needs to be executed within a homebrew file management and launching system.
Keep it simple:
- Put the dumper file on the USB drive
- Don’t bury it in a dozen folders
- Use a USB drive that the PS2 actually detects reliably (older/smaller drives often work best)
Step 3: Boot the PS2 into the launcher environment and run the dumper
This is the part that varies most depending on your setup.
What you’re trying to do is:
- start a PS2 homebrew launcher,
- open the USB drive,
- Run the BIOS dumper,
- Follow the on-screen prompts to dump the BIOS.
When it finishes, it will write BIOS-related files to the USB drive.
Step 4: Don’t interrupt the dump
This sounds obvious, but it matters:
- Don’t power off mid-process
- Don’t remove the USB drive early
- Wait until the tool confirms it’s completed
Move the BIOS to your PC and verify it
Once you have the dumped files on your USB:
- Safely remove the USB from the PS2
- Plug it into your PC
- Copy the BIOS files into a folder you control (example):
- Windows: Documents\PCSX2\bios\
- Or: C:\Emulation\PCSX2\bios\ (I like simple paths)
What should the BIOS file look like?
Common BIOS dumps include files that:
- end in .bin
- may include “SCPH” in the filename
- are often around a few megabytes in size (exact sizes vary)
Verify integrity (recommended)
If you can, use a checksum tool (SHA) to confirm the file didn’t get corrupted during copying. This isn’t mandatory, but it’s a smart habit—especially if you’re troubleshooting later.
How to add the BIOS to PCSX2 (Windows / Linux / macOS)
This part is straightforward once the BIOS is in the right place.
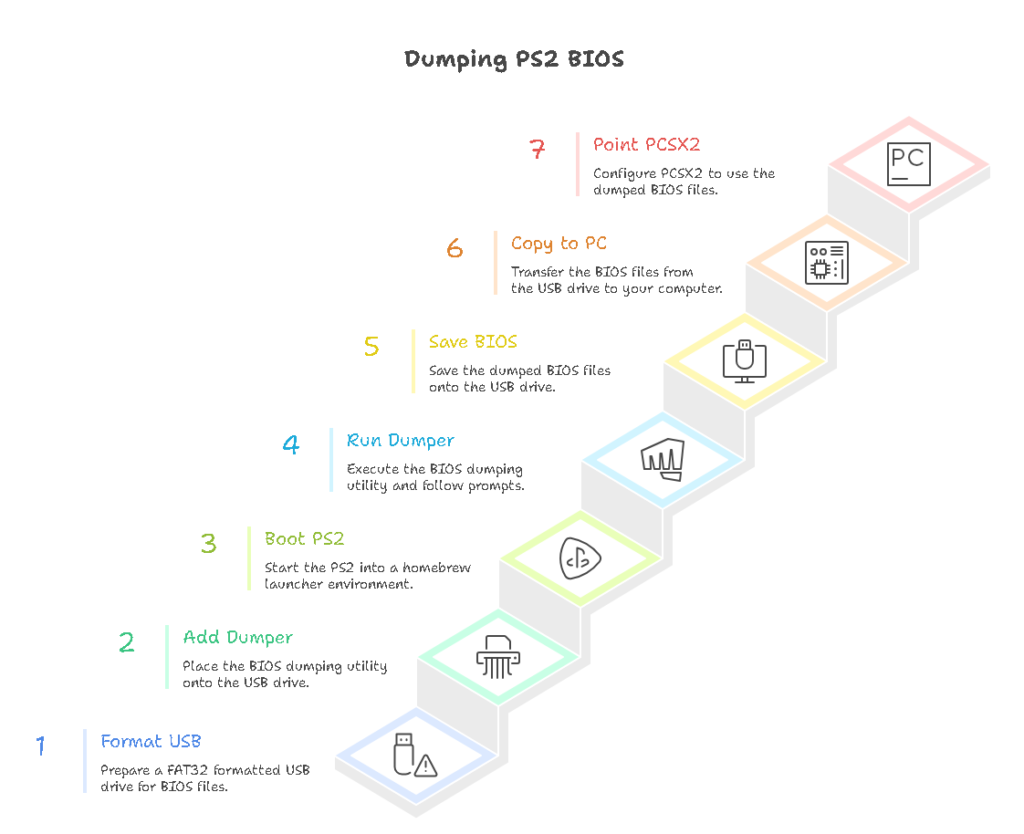
1) Open PCSX2 and go to BIOS settings
Depending on the PCSX2 version (stable vs nightly), the UI wording differs slightly, but the idea is the same:
- Go into Settings / Configuration
- Find BIOS
- Choose Browse (or select the BIOS directory)
2) Select your BIOS folder
Point PCSX2 to the folder where your dumped BIOS lives.
3) Pick the BIOS entry
PCSX2 should now list one or more BIOS versions. Select the one you want and confirm.
4) Test boot
Try:
- Booting the BIOS (system menu), or
- Booting a game you legally own (from your own disc dump)
If everything is correct, you should see proper boot behavior.
BIOS region: do you need USA/EU/JP?
This is one of the most overlooked details.
PS2 BIOS files come in regions, commonly:
- NTSC-U (USA)
- PAL (Europe)
- NTSC-J (Japan)
My rule of thumb
Match your BIOS region to the games you play most.
- If you mainly play US releases → use NTSC-U BIOS
- If you mainly play European releases → use PAL BIOS
- If you mainly play Japanese releases → use NTSC-J BIOS
Will some games still boot with a different region BIOS? Sometimes, yes. But when people run into odd behavior, region mismatch is often one of the first things I check.
Common issues and fixes
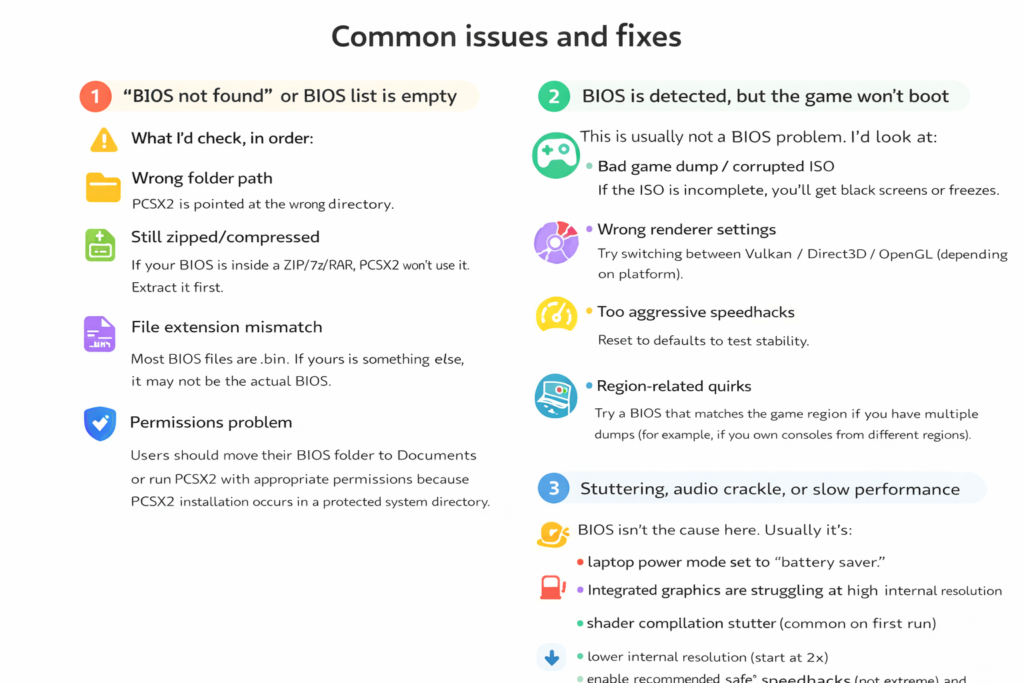
Issue 1: “BIOS not found” or BIOS list is empty
What I’d check, in order:
- Wrong folder path
PCSX2 is pointed at the wrong directory. - Still zipped/compressed
If your BIOS is inside a ZIP/7z/RAR, PCSX2 won’t use it. Extract it first. - File extension mismatch
Most BIOS files are .bin. If yours is something else, it may not be the actual BIOS. - Permissions problem
Users should move their BIOS folder to Documents or run PCSX2 with appropriate permissions because PCSX2 installation occurs in a protected system directory.
Issue 2: BIOS is detected, but the game won’t boot
This is usually not a BIOS problem. I’d look at:
- Bad game dump / corrupted ISO
If the ISO is incomplete, you’ll get black screens or freezes. - Wrong renderer settings
Try switching between Vulkan / Direct3D / OpenGL (depending on platform). - Too aggressive speedhacks
Reset to defaults to test stability. - Region-related quirks
Try a BIOS that matches the game region if you have multiple dumps (for example, if you own consoles from different regions).
Issue 3: Stuttering, audio crackle, or slow performance
BIOS isn’t the cause here. Usually it’s:
- laptop power mode set to “battery saver.”
- Integrated graphics are struggling at high internal resolution
- shader compilation stutter (common on first run)
Fixes:
- lower internal resolution (start at 2x)
- enable recommended “safe” speedhacks (not extreme)
- keep PCSX2 updated (nightly builds often improve performance and compatibility)
Legal + safety checklist (what I recommend you follow)
If you want the cleanest setup—especially if you’re doing this on your main computer—here’s what I’d stick to:
- Use a BIOS dumped from a PS2 you own
- Don’t share your BIOS online (it’s copyrighted system software)
- Avoid random “BIOS packs” (huge malware risk)
- Keep your BIOS backed up privately (cloud storage is fine if it’s private)
- Use games you legally own (your own disc dumps)
This approach is not only safer—it also saves you hours of troubleshooting later.
Final thoughts
The installation process for PCSX2 reaches a point where it seems complete until users need to complete the BIOS installation which leads to user dissatisfaction. Your understanding of BIOS functions together with your decision to follow legal methods through console dumping will lead you to a stable and straightforward process.
I will assist you in creating the optimal BIOS folder arrangement and settings configuration for your PCSX2 installation if you provide me with your current operating system either Windows or macOS or Linux and your selected PCSX2 version between stable and nightly.