PS1 Bios Download for DuckStation, RetroArch & ePSXe Emulators 2026
If you are reading this, you are probably exactly where I was a few years ago: sitting in front of a PC or a shiny new Android phone, desperate to replay Metal Gear Solid or Final Fantasy VII, only to be hit with a black screen or an error message saying “BIOS Not Found.”
Welcome to the definitive guide for 2026. As someone who has been tinkering with emulation since the early days of Bleem! and the original Connectix VGS, I know how frustrating it can be to get your settings just right. The PlayStation 1 is a masterpiece of a console, but emulators—no matter how advanced they get—still need that one crucial ingredient to bridge the gap between your modern hardware and the 1990s magic: the PS1 BIOS.
On this page, I’m not just going to toss a file at you. I’m going to walk you through exactly what these files are, why you need them, and how to set them up on the “Big Three” emulators: DuckStation, RetroArch, and ePSXe.
Download Now: The All-In-One PS1 BIOS Pack
I have compiled the most compatible, stable, and verified BIOS files into a single pack. These are the exact files I use on my own rig to ensure 100% compatibility across regions.

PS 1 Bios Download
- Genre: Emulator
- Last Updated: June 10, 2025
- Compatibility: Windows, iOS and Android
- Downloads: 500k+
- Supporting Emulators: DuckStation, RetroArch & ePSXe Emulators
- Price: Free (Mod Version)
What Exactly is the PS1 BIOS? (And Why Do You Need It?)
Let’s get technical for a moment, but I’ll keep it simple. The BIOS (Basic Input/Output System) is the proprietary software that was physically soldered onto a chip inside the original PlayStation 1 motherboard.
Think of the BIOS as the console’s subconscious. When you pressed the power button on your gray console back in 1995, the BIOS was the first thing to wake up. It checked if the memory card was inserted, it initialized the hardware, and—most importantly—it decided if the disc you put in was a valid, licensed game for your region.
The Emulation Bottleneck
Modern emulators like DuckStation or RetroArch are incredibly smart software that mimics the PS1 hardware. However, for legal and copyright reasons, emulator developers generally cannot include the Sony BIOS file with their download.
Without this file, the emulator is like a car without keys. It has the engine (the code to run games), but it can’t start the ignition.
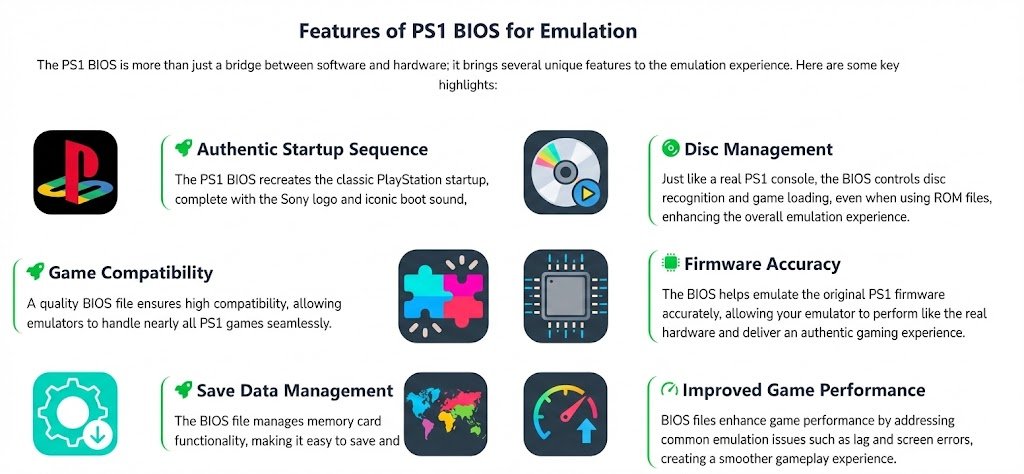
In my experience, having the correct BIOS does four critical things:
- Boot Sequence: It enables that iconic Sony diamond logo and the deep, resonant startup sound (which, let’s be honest, is half the reason we play these games).
- Memory Card Management: It handles the formatting and saving of game data exactly how the original hardware did.
- Region Verification: It dictates whether you can play NTSC (US/Japan) or PAL (Europe) games.
- Compatibility Fixes: Many games rely on specific BIOS calls to run. Without them, you get crashes, audio desync, or missing textures.
Features of PS1 Bios
Understanding the Different BIOS Files (Don’t Skip This!)
Over the years, I’ve seen dozens of users download the wrong file and wonder why their European copy of Crash Bandicoot runs in slow motion. Sony released different BIOS versions for different regions.
Here is a breakdown of the files you will find in my pack. I have organized this table based on my testing of stability and region compatibility.
PS1 BIOS Version & Region Compatibility
| BIOS Filename | Region | Description & My Recommendation |
|---|---|---|
| SCPH1001.BIN | USA (NTSC-U) | The Gold Standard. This is the BIOS from the original launch model. It has the highest compatibility with US games. If you only download one file, make it this one. |
| SCPH7502.BIN | Europe (PAL) | Essential for European games. PAL games run at 50Hz (25fps). Using a US BIOS for a PAL game can sometimes cause audio pitch issues or speed glitches. |
| SCPH5500.BIN | Japan (NTSC-J) | Required for Japanese imports. If you love JRPGs that never came to the West, you need this file to display Japanese text correctly. |
| SCPH7003.BIN | Global / Hybrid | A later revision. It is surprisingly stable for multi-region use, but I still prefer matching the BIOS to the game region for accuracy. |
| SCPH101.BIN | USA (PSOne) | This comes from the smaller, rounded “PSOne” model. It works well, but I find the SCPH1001 to be slightly more robust for older titles. |
Pro-Tip: Most modern emulators like DuckStation represent the “Region Free” era. They can sometimes force a US game to run on a JP BIOS, but I strongly advise against it. For the purest experience (and fewer bugs), match your BIOS to your game’s region.
I also added some other bios files that were dumb by various gamers:
Which Emulator Should You Use?

Before we get to the installation, let me give you my personal take on the software available in 2026.
1. DuckStation (The Modern King)
In my honest opinion, if you have a device made in the last 5 years, DuckStation is what you should be using. It is incredibly optimized. I use it to upscale PS1 games to 4K resolution on my PC, and it fixes the “wobbly textures” (affine texture mapping warping) that plagued the original console. It requires a BIOS to function.
2. RetroArch (The All-Rounder)
RetroArch isn’t an emulator; it’s a frontend that runs “Cores.” The best core for PS1 is Beetle PSX HW. It is highly accurate but requires a bit more horsepower. If you like having all your consoles (SNES, Sega, PS1) in one app, this is for you.
3. ePSXe (The Old Guard)
ePSXe was the king for a long time. It’s still great for older Android phones or very weak PCs. However, development has slowed down compared to DuckStation. I still keep it installed as a backup because it is very “plug and play.”
Step-by-Step Installation Guides
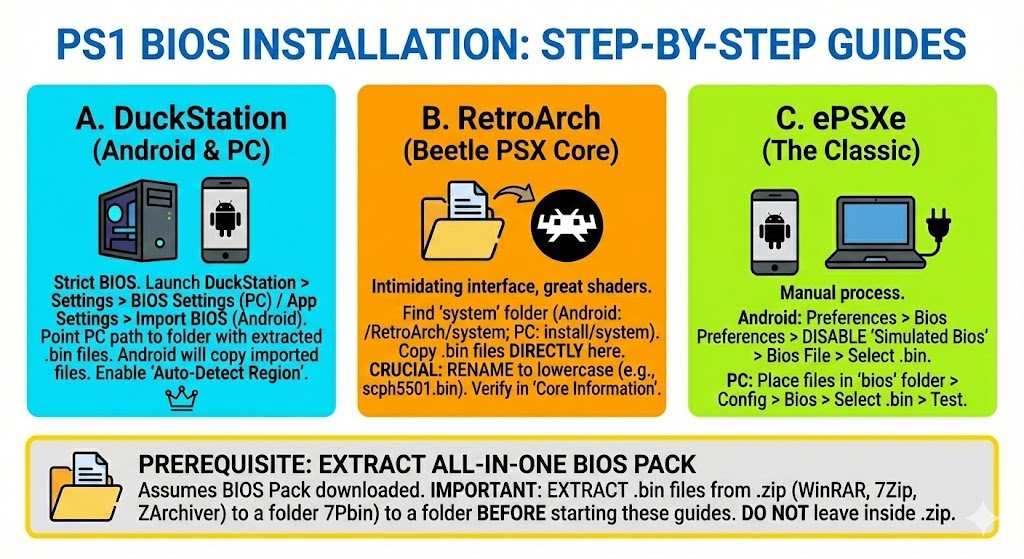
I have written these guides assuming you have already downloaded the All-In-One BIOS Pack from the link above and extracted the .bin files to a folder on your device.
Important: Do not leave the files inside the .zip. You must extract them using WinRAR, 7Zip, or ZArchiver (on Android).
Scenario A: Setting Up DuckStation (Android & PC)
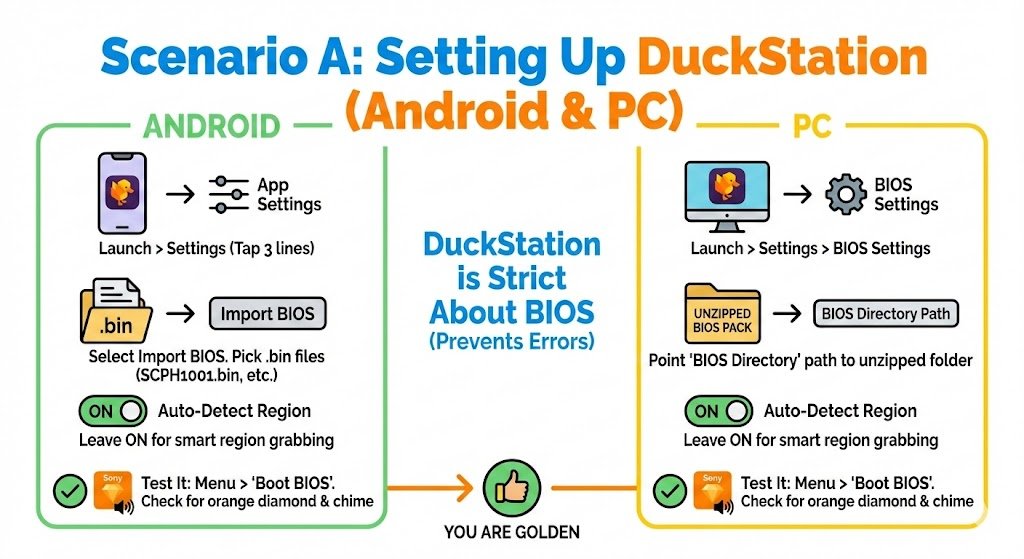
DuckStation is strict about BIOS files, which is actually a good thing because it prevents errors later.
- Launch DuckStation. On the first boot, it usually runs a setup wizard. If you skipped it, don’t panic.
- Navigate to Settings. On Android, tap the three lines in the top left > App Settings. On PC, click Settings > BIOS Settings.
- The BIOS Directory. DuckStation doesn’t just want you to pick a file; it wants a folder.
- PC: Point the “BIOS Directory” path to the folder where you unzipped my pack.
- Android: Select Import BIOS. Navigate to your download folder and select the
.binfiles (SCPH1001.bin, etc.). The app will copy them into its own internal storage.
- Region Matching. There is a setting called “Auto-Detect Region.” Leave this ON. DuckStation is smart enough to see you are loading a US game and will automatically grab the
SCPH1001.binfrom the library you just imported. - Test It. Go to the menu and select “Boot BIOS.” If you see the orange Sony diamond and hear the chime, you are golden.
Scenario B: Setting Up RetroArch (The Beetle PSX Core)
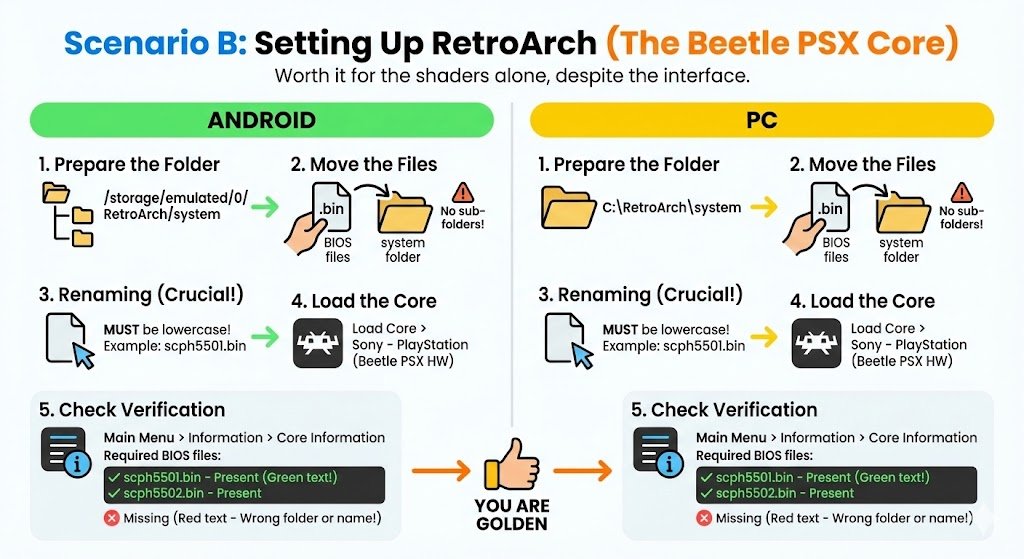
RetroArch can be intimidating because of its interface, but stick with me. It is worth it for the shaders alone.
- Prepare the Folder. RetroArch has a specific “System” folder.
- Android: Usually located at
/storage/emulated/0/RetroArch/system. - PC: Located inside your install folder, usually
C:\RetroArch\system.
- Android: Usually located at
- Move the Files. You must copy your
.binBIOS files directly into thissystemfolder. Do not put them in a sub-folder. - Renaming (Crucial Step). RetroArch cores are picky about names. Ensure your files are named exactly
scph5501.bin,scph5502.bin, etc. Keep them lowercase. I have found that uppercase extensions (.BIN) sometimes confuse the Linux-based versions of RetroArch. - Load the Core. Open RetroArch > Load Core > Sony – PlayStation (Beetle PSX HW).
- Check Verification. Go to Main Menu > Information > Core Information. Scroll down. You should see a list of required BIOS files. If you put them in the right folder, it will say “Present” in green text. If it says “Missing” in red, you have the wrong folder or wrong filename.
Scenario C: Setting Up ePSXe (The Classic)
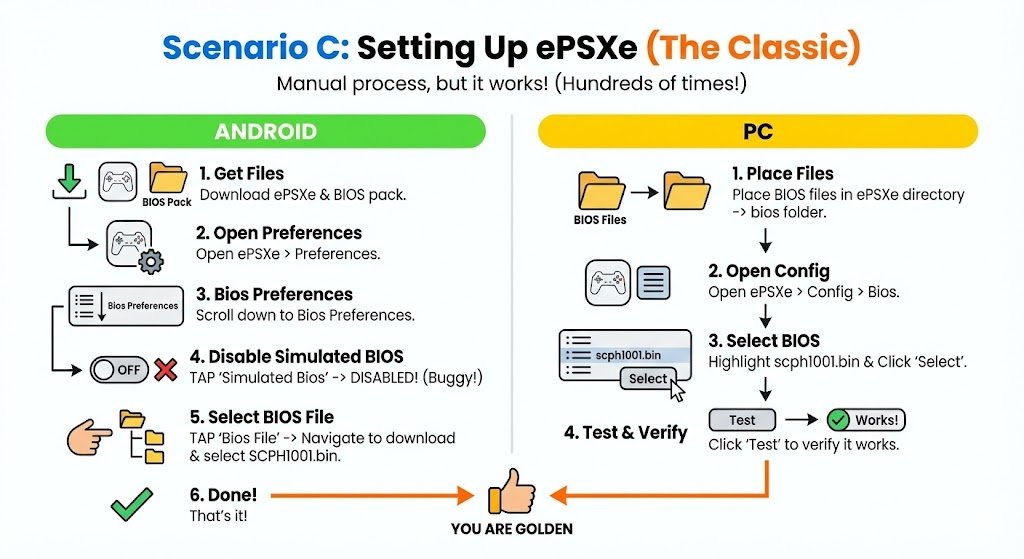
I’ve set up ePSXe hundreds of times. It’s a manual process, but it works.
For Android Users:
- Download ePSXe and the BIOS pack.
- Open ePSXe and select Preferences.
- Scroll down to Bios Preferences.
- Tap Simulated Bios and make sure it is DISABLED. Simulated BIOS is buggy and has low compatibility. We want the real deal.
- Tap Bios File. The app acts like a file manager. Navigate to your download folder and select
SCPH1001.bin. - That’s it.
For PC Users:
- Place your BIOS files in the
biosfolder located inside your ePSXe directory. - Open ePSXe. Go to Config > Bios.
- A list should appear. Highlight
scph1001.binand click Select. - Click Test to verify it works.
Troubleshooting: Common Issues & Fixes
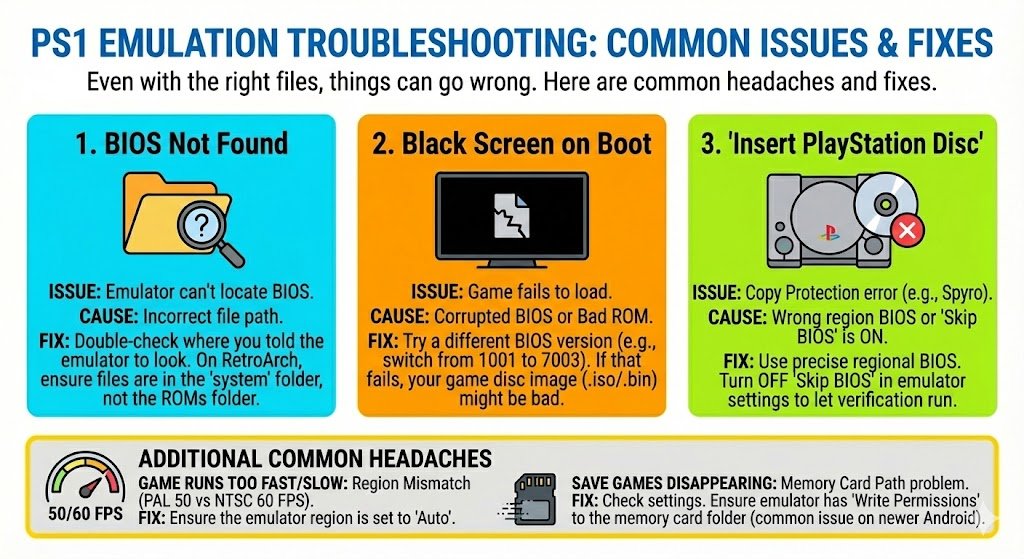
Even with the right files, things can go wrong. Here is a table of the most common headaches I’ve encountered and how to fix them.
Troubleshooting Guide
| Error / Issue | Probable Cause | How I Fix It |
|---|---|---|
| “BIOS Not Found” | Incorrect file path | Double-check where you told the emulator to look. On RetroArch, ensure files are in the system folder, not the ROMs folder. |
| Black Screen on Boot | Corrupted BIOS or Bad ROM | Try a different BIOS version (e.g., switch from 1001 to 7003). If that fails, your game disc image (.iso/.bin) might be bad. |
| “Insert PlayStation Disc” | Copy Protection | This happens with games like Spyro or Dino Crisis. Ensure you are using the precise BIOS for the region. Turn off “Skip BIOS” in emulator settings to let the verification run. |
| Game Runs Too Fast/Slow | Region Mismatch | You are likely running a PAL (Europe) game on an NTSC settings or vice versa. PAL runs at 50 FPS; NTSC at 60 FPS. Ensure the emulator region is set to “Auto.” |
| Save Games Disappearing | Memory Card Path | Check your Memory Card settings. Ensure the emulator has “Write Permissions” to the folder where memory cards are stored (common issue on newer Android versions). |
Features You Get by Using Real BIOS Files
Why go through this trouble? Why not just use HLE (High-Level Emulation) which simulates the BIOS?
- Save States vs. Memory Cards: While emulators allow “Save States” (freezing time), using the real BIOS allows you to use the in-game Memory Card save slots. I always recommend using in-game saves as your primary method, as Save States can sometimes corrupt your file if you update the emulator.
- Disc Swapping: Multi-disc games like Metal Gear Solid or Final Fantasy VIII require the BIOS to handle the “Please Insert Disc 2” prompt. Without a real BIOS, the emulator often hangs at this screen.
- System Interface: You can actually boot into the BIOS without a game (the Memory Card / CD Player screen). It’s great for managing your save files, deleting old saves, or just listening to the ambient music for nostalgia.
Is This Legal? A Note on Safety
I want to be transparent with you. Emulators themselves are 100% legal. They are just software that mimics hardware. However, the BIOS file is copyrighted code belonging to Sony.
Technically, to use these files legally, you should own the original console and dump the BIOS file from your own machine. However, the files provided here are intended for archival and educational purposes, helping you preserve the functionality of hardware that is no longer manufactured.
Why download from psbios.com / kuwaitsexpat.com?
- Malware Free: I scan every zip file. I hate viruses as much as you do.
- No Bloatware: You get the
.binfile. No exe installers, no toolbars, no nonsense. - verified Hashes: I check the MD5 checksums of the files to ensure they are the exact 1:1 copies of the original Sony chips.
Frequently Asked Questions (FAQs)
Q: Can I use the PS2 BIOS to play PS1 games?
A: Generally, no. While the PS2 was backward compatible, PS2 emulators (like PCSX2) and PS1 emulators (like DuckStation) use entirely different architectures. You need the specific PS1 BIOS files listed above for PS1 emulation.
Q: Which is better: NTSC or PAL?
A: If you have a choice, I always recommend NTSC (USA/Japan). NTSC games run at 60Hz, which is smoother and faster. PAL (European) games were often poorly converted in the 90s, resulting in black borders on the screen and slower gameplay (50Hz). Always aim for the SCPH1001.bin (USA) version of the game and BIOS if possible.
Q: My Android phone says “Can’t Open File” when I click the download.
A: That is because it is a ZIP file. Android doesn’t always know what to do with them natively. Download an app called ZArchiver from the Play Store. Open ZArchiver, find the download, and extract it. Then point your emulator to the extracted folder.
Q: Do I need a different BIOS for every game?
A: No! That would be a nightmare. You generally only need one for each major region. I keep SCPH1001 (USA), SCPH7502 (Europe), and SCPH5500 (Japan) in my folder. That covers 99.9% of the entire PlayStation library.
Final Thoughts
Setting up an emulator can feel like hacking, but the reward is worth it. Being able to pull out your phone on a flight and play Castlevania: Symphony of the Night or sitting at your PC and seeing Gran Turismo upscaled to high definition is a magical experience.
I hope this guide cleared up the confusion surrounding PS1 BIOS files. If you follow the steps above, use the files provided, and stick to the recommended emulators, you’ll be gaming in no time.