How to Dump Your PS2 BIOS Safely from Your Own Console
If you’re setting up a PlayStation 2 emulator like PCSX2 on your laptop or AetherSX2 on Android, you’ll quickly run into one requirement that confuses almost everyone at the start: the PS2 BIOS.
I’ve done this process more times than I can count—on a chunky “fat” PS2, on Slim models, with Free McBoot, and also on totally stock consoles. Once you do it the right way, it’s honestly straightforward and way safer than grabbing random files from the internet.
In this guide, I’m going to walk you through dumping (copying) the BIOS from your own PS2, step by step, in plain language. I’ll explain what you need, what each method looks like, how to verify your BIOS dump is correct, and how to load it into PCSX2/AetherSX2.
What a PS2 BIOS File Is (and Why Emulators Need It)
The BIOS (Basic Input/Output System) is basically the PS2’s internal brain. It’s the firmware that:
- boots the console,
- initializes hardware,
- handles memory card and disc functions,
- and provides system services games expect.
When you run a PS2 emulator, you’re not running a PS2 program. You’re running software that simulates PS2 hardware. For that illusion to be accurate, most emulators require the real BIOS.
Why you specifically need it
From my experience setting up emulators for friends (and fixing their broken setups), the BIOS is the difference between:
- games booting cleanly vs. black screens,
- stable performance vs. weird crashes,
- proper memory card behavior and compatibility vs. constant bugs.
PCSX2, in particular, is designed around using a real BIOS dump.
What You Need Before You Start
Let’s keep this simple: you need a way to run a BIOS dumper homebrew app on your PS2, and you need a place to save the dumped files (usually USB).
Universal checklist (recommended)
- A PS2 console you own (any model: fat or slim, any region)
- A USB flash drive (small/older drives often work best)
- USB must be formatted as FAT32
- uLaunchELF (the PS2 file manager/homebrew launcher)
- A BIOS dumper ELF (a small homebrew tool that reads your BIOS and writes it to storage)
If your PS2 is already modded (best case)
You likely have:
- Free McBoot (FMCB) on a memory card, or
- a modchip that lets you launch homebrew
If you have FMCB, this is going to feel easy.
If your PS2 is unmodded (stock console)
You’ll need one way to start homebrew temporarily, such as:
- FreeDVDBoot (works on many—but not all—models)
- Swap Magic (boot disc method)
- Borrow/buy a Free McBoot memory card (honestly the most practical path if you’re stuck)
I’ll walk you through the options below.
Method 1 (Easiest): Dump BIOS on a Modded PS2 / Free McBoot
If you see a custom menu when your PS2 starts (often with entries like uLaunchELF, ESR, Free McBoot), you’re already in the “easy lane.”
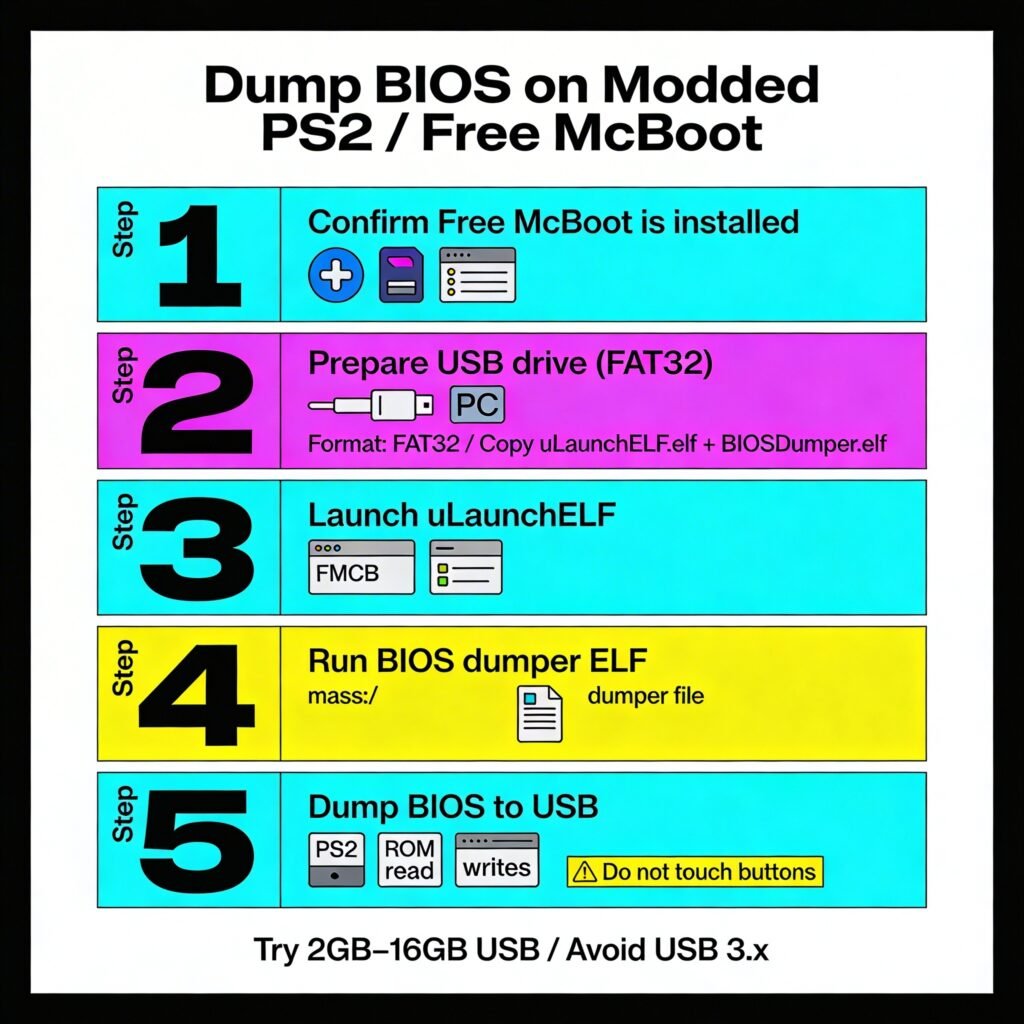
Step 1: Confirm Free McBoot is installed
- Turn off your PS2.
- Insert the FMCB memory card.
- Power on.
If you see the FMCB menu, you’re good.
Step 2: Prepare your USB drive (FAT32)
This matters more than people think.
- Plug USB into your PC
- Format as FAT32
- On Windows: right-click drive → Format → FAT32
- On macOS: Disk Utility → MS-DOS (FAT)
Then copy these onto the USB:
- uLaunchELF.elf (if you don’t already have it available in FMCB)
- your BIOS dumper file (usually something like BIOSDumper.elf)
Tip from my own trial-and-error: Some PS2s are picky with modern large USB sticks. If your USB isn’t detected, try an older/smaller drive (2GB–16GB), and avoid fancy USB 3.x drives if possible.
Step 3: Launch uLaunchELF
- In the FMCB menu, open uLaunchELF
- You’ll see a file browser
Step 4: Run the BIOS dumper ELF
- In uLaunchELF, go to:
- mass:/ (this is your USB drive)
- Highlight your dumper file (example: BIOSDumper.elf)
- Press O (or sometimes X, depending on your controller configuration) to run it
Step 5: Dump the BIOS to USB
The dumper will read your PS2’s ROM and write files to your USB.
- Don’t touch buttons while it’s dumping.
- It might take a minute or two.
- When it finishes, it will usually confirm success.
Now power off, remove the USB, and plug it into your computer.
Method 2: Dump BIOS on an Unmodded PS2 (Still Possible)

If your console is stock, your challenge is not the dumping itself—the challenge is simply: how do I launch the dumper at all?
Here are the realistic paths, from most practical to most technical.
Option A (Most Practical): Use a Free McBoot memory card
If you can get your hands on an FMCB card (borrow one, buy one, or make one using another modded PS2), do it.
Once you have FMCB, you just follow Method 1 above.
This is the route I usually recommend because it’s consistent and doesn’t rely on model-specific DVD exploit support.
Option B: FreeDVDBoot (works on many models)
FreeDVDBoot is a DVD-video player exploit that can boot homebrew from a burned disc on compatible consoles.
High-level steps:
- Check whether your PS2’s DVD Player version is compatible with FreeDVDBoot (compatibility varies).
- Burn the FreeDVDBoot disc image properly.
- Boot the disc to launch uLaunchELF.
- Once uLaunchELF is running, launch the BIOS dumper from USB (same steps as Method 1).
If your model supports it, this method is great—no modchip required. If it doesn’t, don’t waste hours fighting it.
Option C: Swap Magic
Swap Magic is a commercial boot disc solution. If you already own it, you can use it to launch uLaunchELF and then run the BIOS dumper.
The exact steps depend on your Swap Magic version and your console, but the overall flow is:
- Boot Swap Magic
- Launch uLaunchELF (from USB or disc)
- Run BIOS dumper
- Save BIOS to USB
How to Check Your BIOS Dump Is Valid
When you copy the dumped files to your PC, you want to confirm you got a clean dump.
What you should expect
Depending on the dumper, you may see:
- a single BIOS file like SCPH-xxxxx.bin, often around 4 MB, or
- multiple ROM components (common on PS2):
- ROM0, ROM1, ROM2, EROM, NVM, MEC, etc.
Basic validation I personally do
- Check file sizes aren’t 0 KB.
- Keep the original names (don’t rename randomly).
- If you know how: generate a hash (MD5/SHA1) so you can tell later if the file changed.
How to Use the BIOS in PCSX2 (PC) and AetherSX2 (Android)
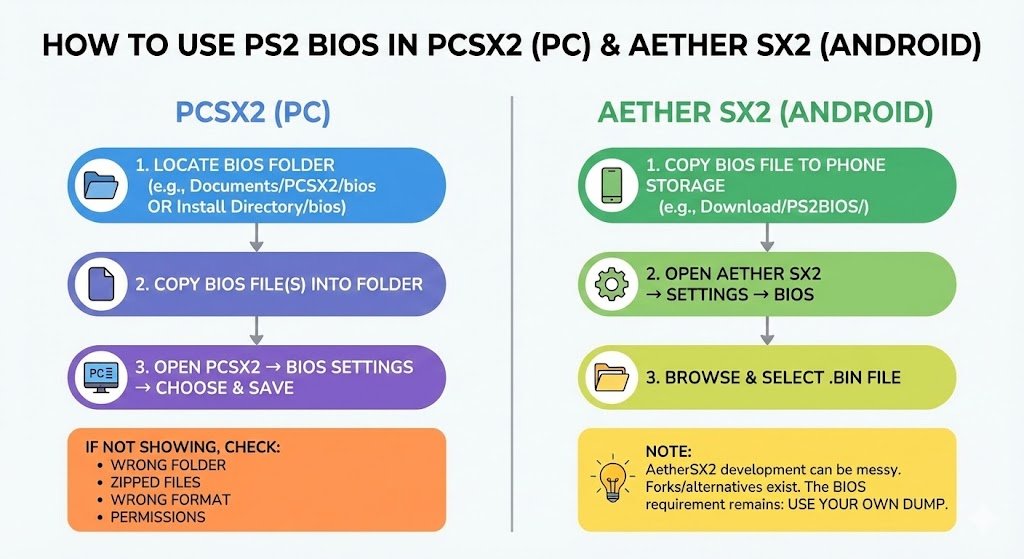
PCSX2 (Windows / macOS / Linux)
- Locate your PCSX2 BIOS folder.
- Many setups use something like:
- Documents/PCSX2/bios
- or a bios folder inside your PCSX2 install directory
- Many setups use something like:
- Copy your BIOS dump file(s) into that bios folder.
- Open PCSX2 → go to BIOS settings/selector.
- Choose your BIOS from the list.
- Save/apply.
If PCSX2 doesn’t show it, the issue is usually:
- wrong folder,
- zipped files,
- wrong format,
- or permissions.
AetherSX2 (Android)
AetherSX2 typically asks you to select a BIOS on first run, or you can set it later in settings.
General flow:
- Copy the BIOS file to your phone storage (example folder: Download/PS2BIOS/)
- Open AetherSX2 → Settings → BIOS
- Browse and select the .bin (or BIOS dump file)
Note: AetherSX2 development has been messy in recent years. You may see forks or alternatives depending on Android version. The BIOS requirement remains the same: use your own dump.
Troubleshooting (Fix the Common Issues)
These are the exact problems I’ve seen most often when helping people get this working.
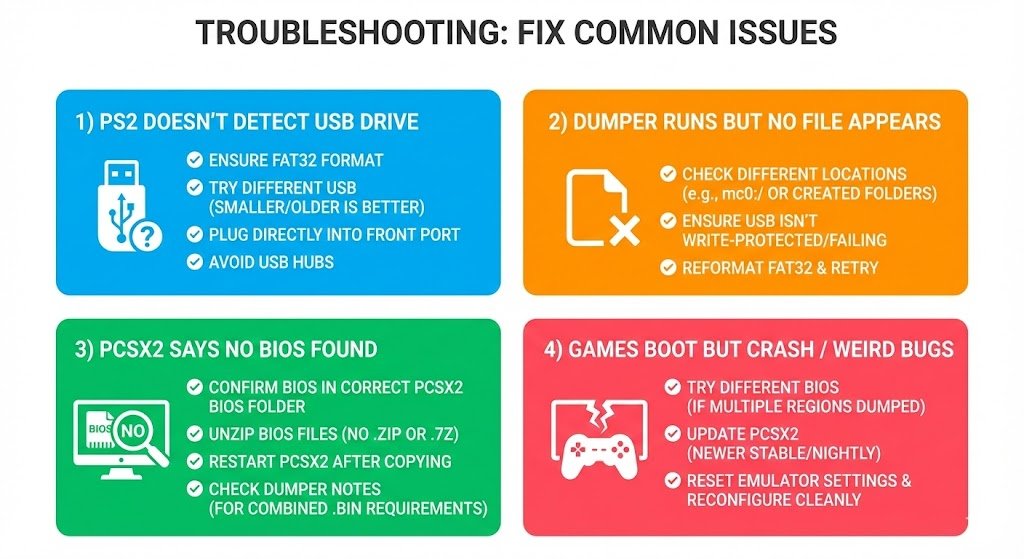
1) “My PS2 doesn’t detect the USB drive”
- Make sure it’s FAT32
- Try a different USB stick (smaller/older is often better)
- Plug it into the front USB port
- Avoid USB hubs
2) “The dumper runs but no file appears”
- Check if it wrote the dump to a different location (sometimes mc0:/ or a folder it creates)
- Make sure the USB isn’t write-protected or failing
- Try reformatting FAT32 and repeating
3) “PCSX2 says no BIOS found”
- Confirm the BIOS is placed in the exact bios folder PCSX2 is using
- Don’t keep the BIOS inside a .zip or .7z
- Restart PCSX2 after copying files
- If multiple files were dumped, read your dumper’s notes—some need a specific combined .bin
4) “Games boot but crash / weird bugs”
- Try a different BIOS if you have multiple region consoles dumped
- Update PCSX2 to a newer stable/nightly build
- Reset emulator settings to defaults and reconfigure cleanly
Best Practices (Backups, Organization, and Staying Safe)
Here’s how I handle BIOS files so I never have to redo the work:
- Make a backup folder on your PC:
- Example: PS2_BIOS_MyConsoles/
- Store a text file noting:
- the console model (SCPH-xxxxx),
- region (NTSC-U/C, PAL, NTSC-J),
- and dump date.
- Keep a second backup (external drive or private cloud).
- Do not upload it publicly and don’t email it around.
If you’re building a proper retro setup, this “organization step” saves you headaches later—especially if you also dump memory cards, saves, or configuration files.
FAQ
Can I dump BIOS from any PS2 model?
Yes—there is a method for every model, but the easiest method depends on whether you can run homebrew (FMCB, modchip, FreeDVDBoot compatibility, etc.).
Do I need different BIOS files for fat vs slim?
Not specifically. What matters more is region and BIOS version. Many people keep more than one BIOS dump, but you can usually run everything fine with a single valid BIOS.
Is dumping the BIOS dangerous for my console?
In my experience, no—because you’re reading data from ROM and writing it to USB. You’re not flashing firmware. Just don’t interrupt the process while it’s dumping.
Should I rename the BIOS file?
I don’t recommend it. Keep original names so emulators and tools recognize them properly.
Final Thoughts
Dumping your PS2 BIOS from your own console is the clean, safe way to emulate. You avoid malware, avoid broken files, and you stay on the right side of legality.
If your PS2 is already running Free McBoot, you can have a working BIOS dump in minutes. If it’s unmodded, you still have options—FreeDVDBoot on compatible systems, Swap Magic, or the simplest route: getting access to an FMCB memory card.