Latest PS2 BIOS File Download for PCSX2 & AetherSX2 Emulators Free 2026
If you want PS2 emulation to feel smooth and reliable, you need one thing first.
A real PlayStation 2 BIOS.
Sony does not offer a public “official BIOS download.” The official route is still easy: dump the BIOS from your own PlayStation 2. It costs nothing, and it keeps you on the right side of copyright rules.
PCSX2 (PC, Linux, macOS, Android) and AetherSX2 (Android) both rely on it. No BIOS means no boot. No menu. No games.
PCSX2 Bios Download Information
PCSX2 Bios Download
- App Name: PS2Bios (Modded Version)
- Latest Version: 8.6v
- File Size: ~12MB
- Genre: Emulator
- Last Updated: June 10, 2025
- Compatibility: Windows, iOS and Android
- Downloads: 500k+
- Supporting Emulators: PCSX2, PS2emu, AetherSX2
- Price: Free (Mod Version)
What Is a PS2 BIOS?
PS2 BIOS stands for Basic Input and Output System. It is the system software stored inside your PlayStation 2 console. It handles core tasks:
- Boots the console
- Shows the PS2 Browser and System Configuration
- Loads discs and memory cards
- Talks to the PS2 hardware at a low level
An emulator copies the PS2 hardware through software. The BIOS supplies the missing system code.
Think of it like this:
- Emulator = the console parts
- BIOS = the console’s internal startup software
Without the BIOS, PCSX2 and AetherSX2 do not behave like a PS2.
PS2 BIOS vs PS1 BIOS
People mix these up.
- PS2 BIOS: Needed for PS2 emulation in PCSX2 and AetherSX2.
- PS1 BIOS: Used for PS1 emulators like DuckStation or ePSXe.
If you want to play classic PlayStation games on an emulator, you need the correct PS2 and PS1 BIOS files. It is just as important to download them from a reliable source you can trust. At Pcsx2 Bios, all files are carefully tested and scanned to ensure they are completely free from viruses, malware, or other unwanted issues.
Latest update. Official PS1 BIOS files are now available. You can download BIOS files for major regions, including the USA, Japan, Europe, and more. Click the download button below and start enjoying your favorite PlayStation 1 games today.
Types of PS2 BIOS versions (regions and models)
BIOS files differ by region and console model. Region matters for:
- Default language and settings
- Video mode (NTSC 60 Hz vs PAL 50 Hz)
- Some game boot behavior
Here are the common groups.
PS2 BIOS region table
|
Region |
Disc region |
|---|---|
|
USA |
NTSC-U |
|
Japan |
NTSC-J |
|
Europe |
PAL |
|
Asia (varies) |
NTSC-J or other |
|
China (rare) |
NTSC-C |
What about “region free BIOS” files?
You will see “region free” BIOS files online. Many of them are edited or bundled in ways you cannot verify. You do not need them.
PCSX2 and AetherSX2 already support running games from many regions with the right settings. Start with a clean dump from your own console.
Which PS2 BIOS file should you use?
Use the BIOS from the same region as most of your games.
Simple rules:
- If you mostly play NTSC-U games, use a USA BIOS.
- If you mostly play PAL games, use a Europe BIOS.
- If you mostly play Japan-only games, use a Japan BIOS.
Best practice: keep more than one BIOS
Some titles behave better with a different BIOS revision. Keeping multiple BIOS folders takes little space and gives you options when a game fails to boot.
Where to get an official PS2 BIOS (free and legal)
You get an official BIOS for free when you dump it from a PS2 you own.
You need:
- A PlayStation 2 console
- A way to run a BIOS dumper on the PS2
- A USB drive (FAT32 works best)
- A PC or Android phone to move files after the dump
Below are two common approaches. Pick the one that matches your setup.
Method 1: Dump BIOS with FreeMcBoot (most common)
FreeMcBoot (FMCB) is a memory card exploit that lets your PS2 run homebrew tools. You use a BIOS dumper homebrew app to copy your BIOS to a USB drive.
What you need
- PS2 console
- FreeMcBoot memory card (you already have one, or you set one up)
- USB flash drive formatted as FAT32
- BIOS Dumper homebrew (often named “PS2 BIOS Dumper”)
Steps
- Format your USB drive as FAT32 on your PC.
- Copy the BIOS dumper files to the USB drive.
- Insert:
- FreeMcBoot memory card into the PS2
- USB drive into the PS2
- Boot the PS2 into the FreeMcBoot menu.
- Launch the BIOS dumper app.
- Select the option to dump:
- BIOS
- NVM
- MEC
(Dump everything the tool offers. It helps emulator compatibility.)
- Wait for the dump to finish.
- Power off the PS2.
- Move the dumped files from the USB drive to your PC.
What success looks like
You will see files similar to:
- A BIOS file with a console model or region tag
- NVM file
- MEC file
- Sometimes ROM1, ROM2, EROM
Names vary by dumper. The sizes should look small, not massive.
Method 2: Dump BIOS using a disc-based launcher (less common)
Some users run a dumper through a disc-based method. This depends on your PS2 model and your ability to launch homebrew. If you already run homebrew through discs, the dump steps stay the same:
- Launch the dumper
- Dump BIOS, NVM, MEC
- Copy to USB
If you do not already have this setup, FMCB stays the easiest path.
BIOS file set: what each file does
A “BIOS” folder often holds more than one file. PCSX2 accepts a single BIOS file for boot, but the extra files help accuracy and reduce weird bugs.
Common PS2 BIOS related files
|
File |
What it stores |
|---|---|
|
BIOS (.bin) |
Core boot ROM |
|
NVM |
Console settings and IDs |
|
MEC |
DVD player and media code |
|
ROM1 / ROM2 |
Extra ROM data (varies by model) |
|
EROM |
Extra ROM data (varies by model) |
Keep them together in one BIOS folder. Even if your emulator only asks you to point to one BIOS file, store the set in the same place.
How to verify your BIOS dump (fast safety check)
You want a clean dump. Corrupt dumps waste hours.
Use this checklist:
- File sizes look normal (4 MB to 8 MB for BIOS is common).
- Files open and copy with no read errors.
- You dumped from your own console, not from a random archive.
Extra step (recommended): run a checksum tool on your PC.
- On Windows, use a tool like
7-Zipor a checksum utility. - On Linux or macOS, use
shasumormd5sum.
If you keep multiple BIOS versions, name folders clearly:
PS2_BIOS_USA_SCPH-39001PS2_BIOS_EU_SCPH-70004PS2_BIOS_JP_SCPH-10000
Good labels save time later.
What is PCSX2?
PCSX2 is a free, open-source PlayStation 2 emulator. It runs on:
- Windows
- Linux
- macOS (support varies by build)
- Android (active development)
It supports a large part of the PS2 library, plus modern upgrades:
- Higher internal resolution (sharp 3D)
- Widescreen patches (for many games)
- Save states
- Controller mapping
- Per-game fixes
Key Features of PCSX2
- Huge game library support, including hundreds of popular titles
- Resolution upscaling to 1080p, 1440p, 4K and beyond
- Texture filtering and anti-aliasing
- Widescreen hacks and patches
- Support for DualShock, Xbox, and generic controllers
- Hotkey support and full button remap
- Save states at any point
- Debug tools and log windows for advanced users
- Recording and screenshot support
PCSX2 changes fast. Nightly builds often fix bugs and improve speed.
PCSX2 system requirements
Emulation leans on CPU strength more than most PC games.
PCSX2 PC requirements table
|
Level |
CPU |
|---|---|
|
Minimum playable |
Modern 4-core |
|
Smooth 60 fps |
Strong 6-core or better |
|
High upscale |
Strong 8-core or better |
If your PC runs modern games well, it often runs PCSX2 well.
How to install and set up PCSX2 on PC (Windows)
Step 1: Get PCSX2 from the official site

- Go to the https://pcsx2.net/downloads and select you Operating System.
- Grab the latest stable build or nightly build.
Avoid random repacks. They often bundle adware.
Step 2: Install or extract
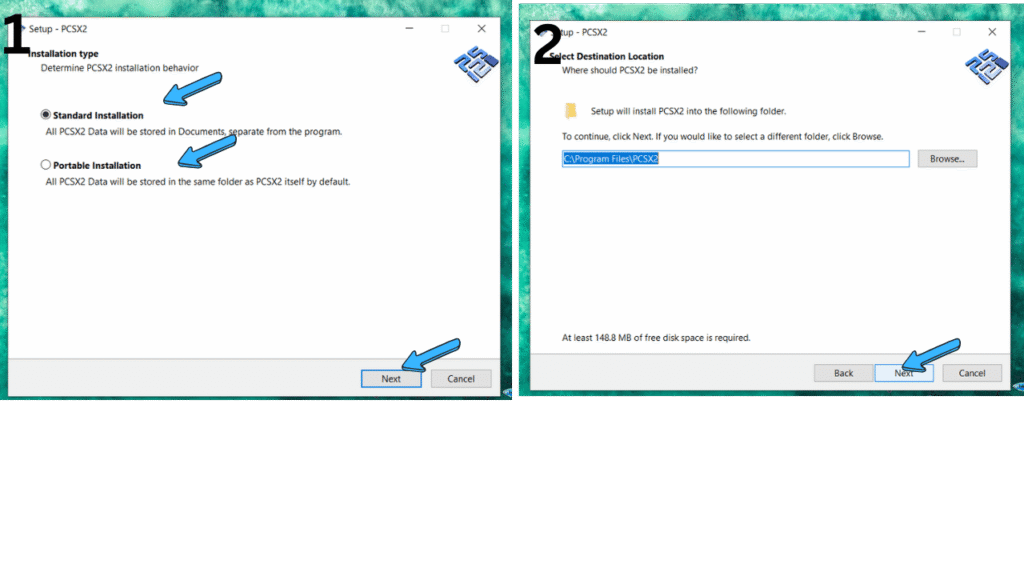
PCSX2 comes as:
- Installer build (simple install)
- Portable build (extract to a folder)
Portable works well if you want all files in one place.
Step 3: Create a BIOS folder

Make a folder you control, for example:
Documents\PCSX2\bios
Copy your dumped BIOS files into it.
Step 4: Select BIOS in PCSX2
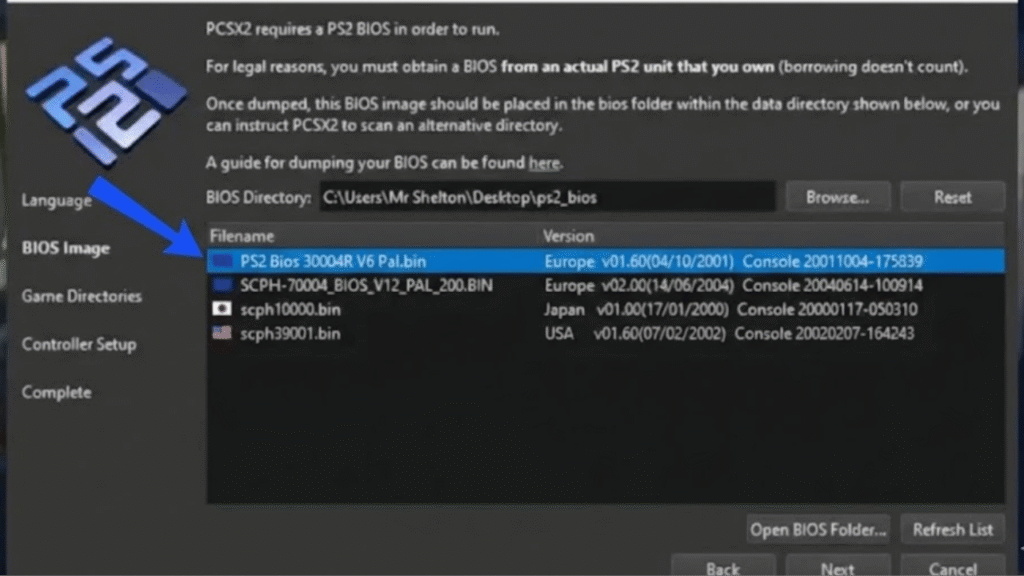
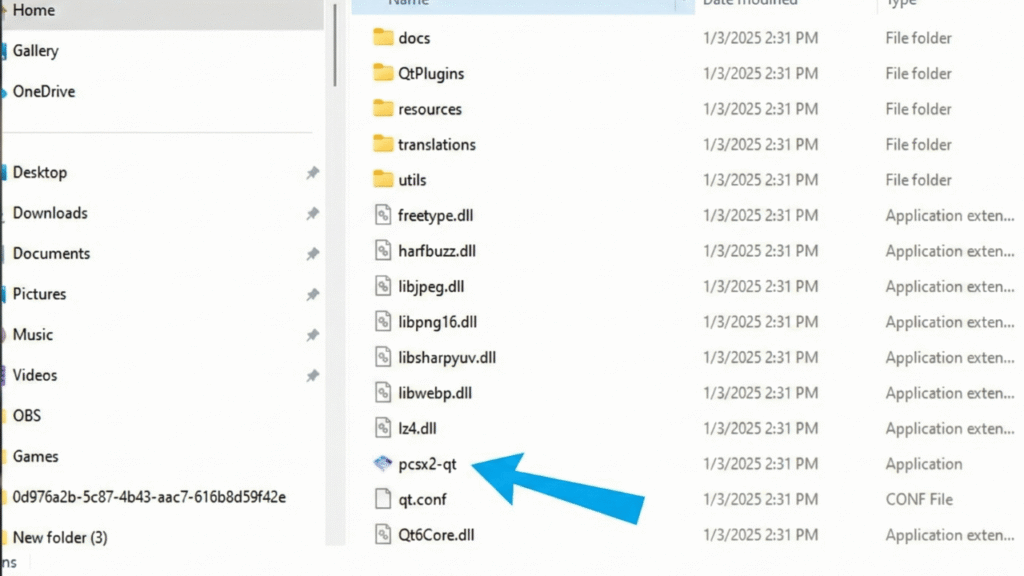
- Open PCSX2.
- Open Settings.
- Find BIOS settings.
- Choose your BIOS folder.
- Pick the BIOS file from the list.
PCSX2 will scan the folder and list detected BIOS options.
Step 5: Set graphics renderer
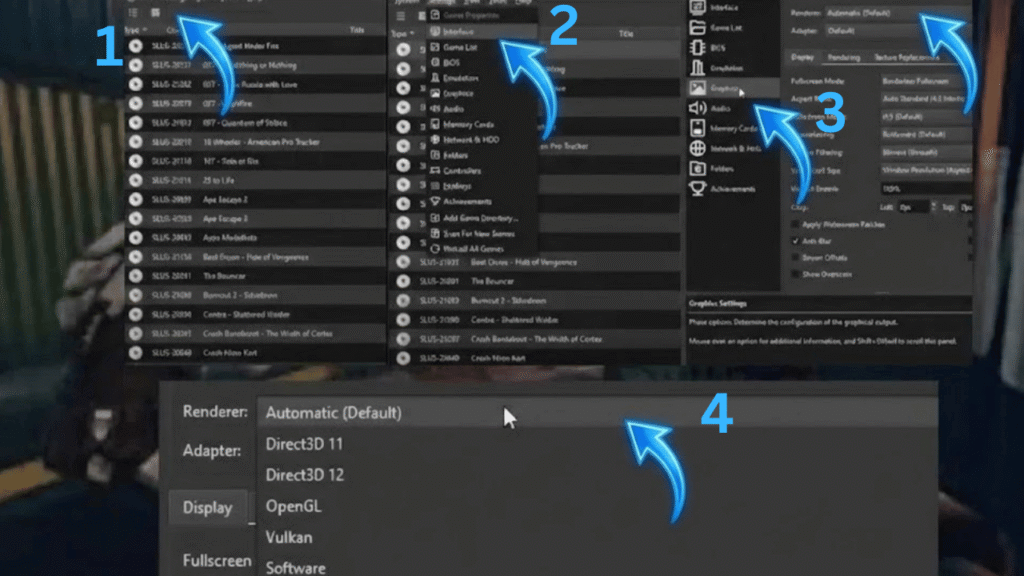
Go to Graphics and set:
- Renderer: Vulkan (good default)
- Internal resolution: start at 2x or 3x
- Blending and hacks: leave defaults first
Step 6: Set controller
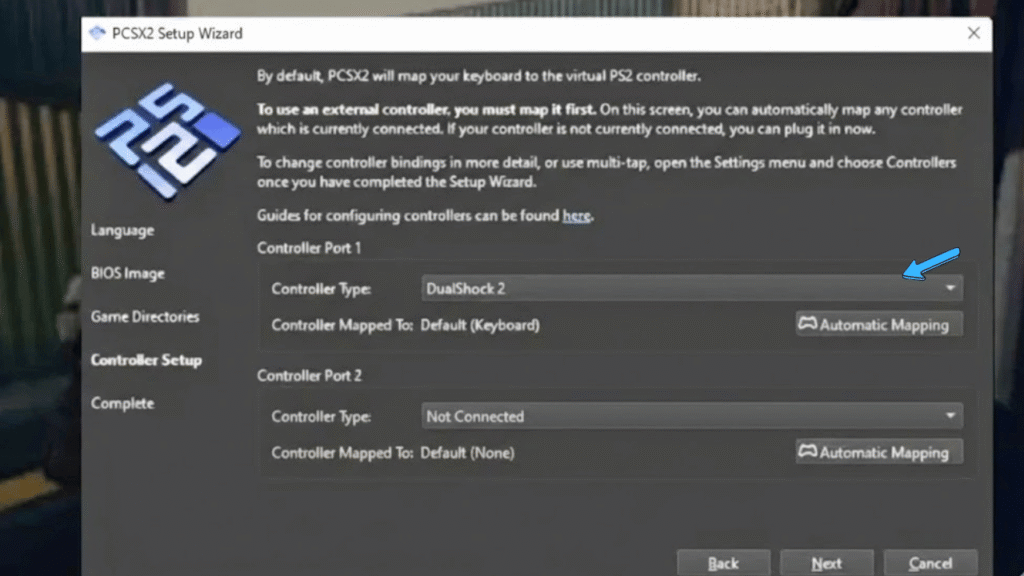
Open Controllers and map inputs:
- Left stick, right stick, D-pad
- Face buttons
- L1, L2, R1, R2
- Start, Select
Use a USB controller for the closest PS2 feel.
Step 7: Add your games
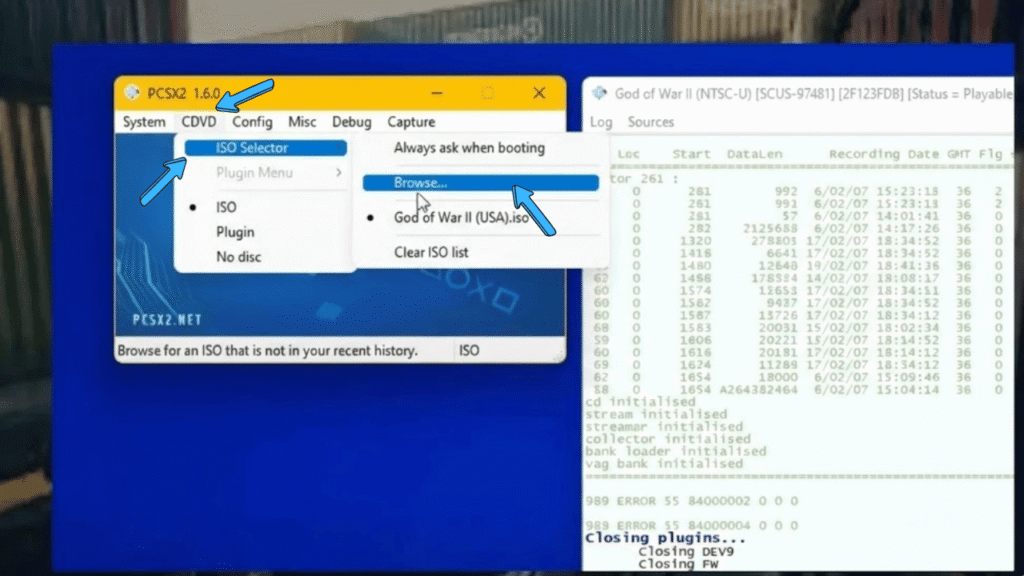
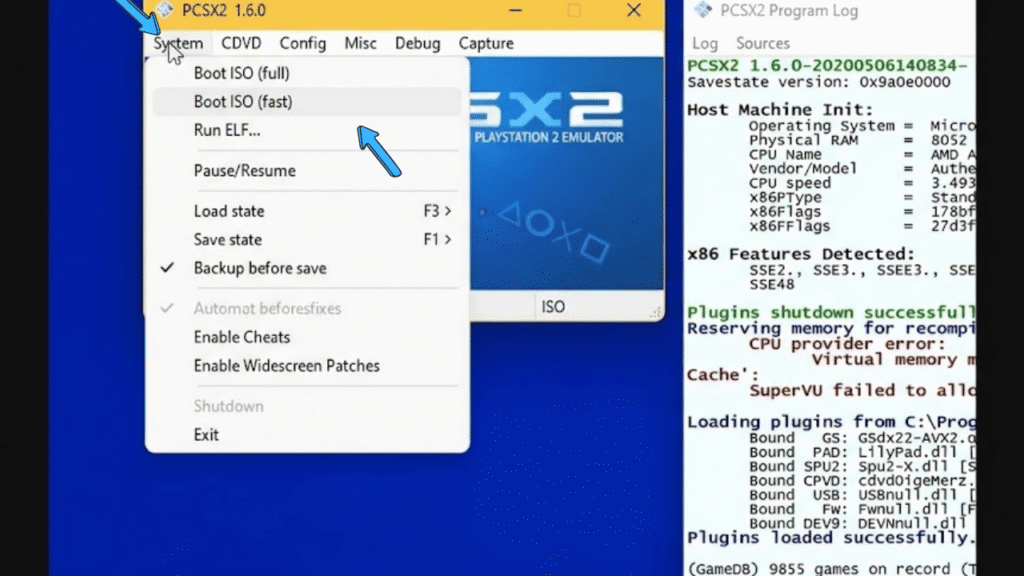
PCSX2 runs PS2 games from disc or ISO.
For ISO:
- Put ISOs in a folder like
D:\PS2_ISOs - In PCSX2, choose Boot ISO and select the game
Default BIOS folder paths (helpful reference)
PCSX2 lets you pick any BIOS folder, but these locations are common.
|
OS |
Common path |
|---|---|
|
Windows |
|
|
Linux |
|
|
macOS |
|
If you use a portable build, keep bios inside the PCSX2 folder for easy backups.
How to set up PCSX2 on Android (official port)
PCSX2 has an Android port in active development. The setup flow looks similar to AetherSX2.
What you need
- Android 9+ (newer works better)
- ARM64 device
- 6 GB RAM or more for smoother results on heavier games
- Vulkan support
Setup steps
- Install PCSX2 Android from a trusted source (official release channel).
- Copy your dumped BIOS files to your phone:
- Example folder:
Internal storage/PCSX2/bios/
- Example folder:
- Open PCSX2.
- Point it to the BIOS folder.
- Add your games folder:
- Example:
Internal storage/PCSX2/games/
- Example:
- Pick a game and boot.
Tip: Keep games on fast storage. Slow SD cards cause stutter in some titles.
How to Use PCSX2 on Linux and macOS
On Linux:
- Install dependencies listed on the PCSX2 site.
- Use AppImage, Flatpak, or a native package from your distro if available.
- Follow the same BIOS and controller steps as on Windows.
On macOS:
- Use official builds for Apple Silicon or Intel where offered.
- Grant any security permissions the first time.
- Keep expectations lower on older Intel Macs, since GPU drivers limit performance.
Paths and menus look similar across platforms.
What is AetherSX2?
AetherSX2 is a PlayStation 2 emulator for Android. Many people still use it because it runs well on the right phones.
Notes you should know:
- Development stopped, so updates and fixes do not arrive through normal channels.
- Many fake builds float around online.
If you use AetherSX2, stick to a clean, known build and avoid modified APKs.
How to set up BIOS in AetherSX2 (Android)
Step 1: Move BIOS files to your phone
Create a folder like:
Internal storage/PS2/BIOS/
Copy your dumped BIOS set into it.
Step 2: Import BIOS in the app
- Open AetherSX2.
- Go to Settings.
- Find BIOS.
- Tap Import BIOS or select BIOS directory.
- Pick the BIOS file from the list.
Step 3: Add games
- Put ISOs in a folder like:
Internal storage/PS2/Games/
- In AetherSX2, add that folder as your game directory.
Step 4: First boot settings
Start with safe defaults:
- Renderer: Vulkan
- Upscale: 2x
- No heavy hacks at first
After you confirm stable boot, raise resolution.
PCSX2 vs AetherSX2 (which one should you use?)
|
Feature |
PCSX2 (PC) |
|---|---|
|
BIOS required |
Yes |
|
Updates |
Active |
|
Best for |
Highest accuracy and features |
|
Risk of fake builds |
Low |
If you want long-term support, pick PCSX2 where possible.
Best settings for smooth performance (simple presets)
Do not start with extreme settings. Confirm stable boot first.
Safe baseline (most devices)
- Renderer: Vulkan
- Internal resolution: 2x or 3x
- Anisotropic filtering: 2x to 4x
- Texture upscalers: off at first
- Speed hacks: default
Preset table
|
Device level |
Internal resolution |
|---|---|
|
Budget Android / older PC |
1x to 2x |
|
Mid range phone / mid PC |
2x to 3x |
|
High end phone / strong PC |
3x to 6x |
Phones throttle under heat. Use a lower resolution if frames drop after 10 minutes.
How to dump your PS2 discs into ISO (legal backup)
You need your own disc. You need a clean rip.
On PC with a DVD drive
- Insert the PS2 disc into your DVD drive.
- Use a disc imaging tool that supports raw reads.
- Create an ISO.
- Test the ISO in PCSX2.
Quick ISO checklist
- ISO size looks correct for the game.
- The game boots to the main menu.
- Audio and video stay stable past the first level.
If a game fails only from ISO, re-rip the disc. Dirty discs cause bad sectors.
Common BIOS errors and fixes
These problems show up often. The fixes stay simple.
Error: “BIOS not found” or “No BIOS image detected”
Fix steps:
Confirm you pointed PCSX2 or AetherSX2 to the correct BIOS folder.
Keep BIOS files unzipped.
Use a BIOS file with the right size (often 4 MB or 8 MB).
Re-dump the BIOS if the file looks suspicious.
Black screen on
boot
Try this:
Switch BIOS region (USA vs Europe vs Japan).
Reset emulator settings to default.
Disable widescreen patches for the first boot.
Try software renderer once to rule out a GPU issue.
Game boots, then crashes
Common causes:
Bad ISO rip
Unstable speed hack settings
Old emulator build
Fix steps:
Test a different game to isolate the issue.
Re-rip the disc.
Use default speed settings.
Update PCSX2 to a newer build.
Slow speed and audio crackle
Fix steps:
Lower internal resolution.
Switch renderer to Vulkan.
Close background apps.
On Android, set battery mode to performance and keep the phone cool.
Save state problems
Save states help, but they break across emulator updates and settings changes.
Rules:
Use in-game saves for long play sessions.
Use save states as short checkpoints.
Do not load an old save state after large setting changes.
Safety rules (avoid bad BIOS files and bad APKs)
BIOS files and emulator APKs often spread with malware.
Follow these rules:
- Dump BIOS from your own PS2.
- Download emulators from official sources only.
- Avoid “all-in-one” packs and repacks.
- Scan files on your PC before you move them to other devices.
- Keep a backup copy of your BIOS dump on cloud storage or an external drive.
A clean BIOS dump stays useful for years.
Example Folder Structure for a Clean Setup
A consistent layout keeps things easy to maintain.
On PC
textDocuments\
  Emulation\
    PS2\
      BIOS\
        PS2_USA\
        PS2_JAPAN\
      Games\
        Action\
        RPG\
        Racing\
      Saves\
      Screenshots\
On Android
textInternal storage\
  Emulation\
    PS2\
      BIOS\
      Games\
      Saves\
Point PCSX2 and AetherSX2 to these top-level folders once. Future games and BIOS versions fall into place without extra work.
FAQ
Do you need a BIOS for AetherSX2?
Yes. AetherSX2 also requires a PS2 BIOS.
Is it legal to download a PS2 BIOS from the internet?
In many places, sharing and downloading BIOS files breaks copyright rules. Dumping the BIOS from a console you own is the safe path.
Which BIOS is best for most games?
Match the BIOS region to your game region. If you want a single starting point, USA BIOS works well for many popular titles, while Europe BIOS fits PAL libraries.
Should you keep more than one BIOS?
Yes. It helps when one BIOS revision has trouble with a specific game.
Do I need a PS2 BIOS for every emulator?
One PS2 BIOS dump from your console works across all PS2 emulators that support external BIOS loading. You only need to share it between them by pointing each emulator to the same folder.
Do I need to match BIOS region with game region?
Not always, but it helps.
For best results:
- Use USA BIOS for USA games
- Use Japanese BIOS for Japanese games
- Use European BIOS for PAL games
Many games run under other regions too, but region matching reduces odd issues.
Do PS1 games use the PS2 BIOS?
PCSX2 does not emulate PS1 games at the same level as a dedicated PS1 emulator. For serious PS1 support, use DuckStation or a similar emulator with its own PS1 BIOS.
How big is a normal PS2 BIOS dump?
Most full dumps fall between 4 MB and 16 MB. Exact size depends on the dumper tool and PS2 model.
If your BIOS file is tiny or hundreds of MB, treat it as suspicious.
Final Thoughts
A good PS2 BIOS setup is simple:
- Own a PS2 console.
- Dump a clean BIOS.
- Feed it to PCSX2 or AetherSX2.
- Keep your folders tidy and your settings modest.
Once the BIOS side looks solid, emulator tuning becomes easy, and your PS2 library feels alive again on both desktop and mobile.
Latest Post
How to Dump PS2 BIOS with Free McBoot 2026
How PCSX2 Plugins Work (and What That Means for You)
Different Types of PS2 BIOS Files (What They Are, Why They Matter, and Which One You Actually Need)
7 Free PS2 Emulators for PC (Windows, Mac, and iOS) in 2026
- 1
- 2